Friday, October 26, 2012

Spooky Science Kit

Spooky Science Kit

I made this Spooky Science Kit for my son's Science teacher. Not only is she a great Science teacher she is also another mom to my kids. They have spent many a summer at her house, we have boys the same age, and we have sat through years and years of basketball games together. 

How I made it.

I bought the silver platter, glittered skull and huge spider at the dollar store. I save small bottles from spices, pills, etc.. Bought the corks from Lowe's and used the craft supplies stashed in my craft room.


  • For the skull I took a tea light and an Exacto knife and traced around the top of the skull. Then scooped out the Styrofoam until the tea light fit in snug. 
  • I picked coordinating paper and labels I found on the internet. You can find some great FREE clip art at http://www.graphicsfairy-crafts.com/2012/10/halloween-printable-labels.html
  • Wrapped the bottles in beads strung through wire, hemp string and ribbon and added a few charms.. 
  • For the glitter tops and Unicorn horn (shell) -Use Mod Podge or Fabri-Tac permanent Adhesive and glitter. 
  • Flock covered rocks (up front). I love using flock. It's not only pretty but feels good. I found that using the Fabri-Tac is the best when flocking/glittering objects like rocks, marbles, and glass. 
  • The spiders hat is made using the top of one of the jars, a circle of paper and 1 piece of metallic scarry cat confetti. I used the Fabri-Tac to adhere the glitter then glued on the cat.
  • I filled the bottles with metallic confetti, twigs and green packaging material. Whatever you have on hand.
  • After I figured out where I was going to place everything I used the Fabri-Tac and glued them all in place. I used some green floral wire to place the spider so that he hovered over the jar and then glued/tacked some of his legs in place.

Package it up in one of those bags, I bought my bag at the Dollar store. Add a card, and some pipe cleaners and there you go. A Spooky Science Kit for your favorite science teacher.

Let me know what you think. If you make this project or use it to inspire you to make something else let me know, send me a pic. I will post your pic. Happy Crafting!!!

I mentioned Fabri-Tac permanent adhesive a few times. It really is my go to glue/adhesive when I want something to really stick. Thought I would add a pic just in case you didn't know what it is. 


Peace Canvas


Peace Canvas made for my daughter Eliza who likes everything rainbows and peace signs.

  • Needed to complete this project:
    • 1 canvas panel 16"x20"  http://www.joann.com/artist-canvas-16-x20-/prd791948/ 
    • Black paint
    • Chipboard letters - I used 5 different font types. If you don't have chipboard letters and have a Cricket use your Cricket to cut out letters on chipboard or thick cardboard. 
    • Stamp'n Up chipboard owls, leaves, dots, flowers and hearts.
    • crayons
    • small iron or quilters seam iron. 
    • circle and full circle stamp about 1 1/4"
    • Mod Podge
    • Sponge paint brush.
I bought my chipboard letters and figures from Stamp'n Up a few years ago. They do not sell these sets anymore as far as I can tell. You can buy chipboard letters and such from scrapbook stores and craft stores. 

  • Using your black paint, paint your canvas. I painted it twice. Set aside and let dry.
  • Now it's time to melt your crayons over your chipboard pieces. Pick out the colors you want to use or use the colors I did. The choice is yours. 
    • I will be posting a video on how I do this "crayon melt" technique. But basically you take the crayon you want to use and peel the paper off. Cover your work area with paper, I just used lined school paper. For every color you are going to need a new sheet of paper, you don't want to melt the colors together. Set your small iron or quilters iron to medium. Carefully, and I cannot stress this enough, carefully melt the crayon over 1 letter at a time. Once your letter is covered carefully, again very carefully, make sure that the whole letter is covered sides and all. Again I will be posting a video of this technique.
      • the crayon dries almost immediately and is cool enough to pick up as soon as it is solid looking. I picked mine up and carefully went over it again with the quilter's iron  making it sure the sides were covered.
    • Now cover your chipboard figures the same way.
    • Set your crayoned letters and figures to the side and grab your mod podge. 

  • Using a big foam brush smear mod podge all over your black canvas. I like to go in different to add a bit of texture. Let your glue set for about 10-15 minutes then take your stamps and press them into the mod podge, I gave my filled circle stamp a little twist, I think it works better that way.

  • Let your mod podge dry for for an hour or so. I let my dry overnight because I had to cook dinner. Once it's dry use your mod podge to glue the letters and figures in place. I just gooped on the glue front and back then place them on the canvas. Again, wait 10-15 minutes so that your letter/figures can set, then add a bunch of mod podge again all over sealing around your letters and figures. stamp some more circles let it dry and your done.


Note: If your like me and don't finish the project in 1 day, you can use the same sponge brush, just put it in a baggy or rap it in saran wrap and put it in the fridge.
 

If you make this project same or not please post a picture. I would love to see what you came up with.

Tuesday, October 23, 2012

Halloween Banner


Halloween Banner for the ladies in the office at Eatonville High School. Love those ladies.

Ok the picture turned out fuzzy. I didn't load these until my son, Jesse, took the gift to school, so were stuck with it. But I have some close-ups that turned out a little better. 


How to make it:
  1. Using your Cricket or punches or whatever you have available make 21 black 3" frames. I used my Cricket, Living Simply cartridge. 
  2. Cut out or use your Cricket to save time 19 2 1/2" rectangles in different patterns. I used 5 different patterns. Stay in the same color theme. Mine was orange, black, purple and green.
  3. Glue the rectangles unto the black frames.
  4. Using a shimmery silver paper I cut 1 1/2" squares for all the constants and approximately  1 1/2" square/rectangle of corrugated cardboard for the vowels. 7 vowels 12 constants.
  5. If you have chipboard letters your one step ahead if you don't use your Cricket and cut out different fonts the sizes between 1 1/2" and 1 3/4". The banner reads, "Happy All Hallows' Eve"
  6. Lay out your letters. To get the same effect that I did vary your letters so that every 4th letter is the same. Example: 1st letter is flocked in purple, 2nd letter has a crayon melted unto it in bright orange, 3rd letter has a crayon melted unto it in lime green, 4th letter has black glitter on it. Then repeat. 
  7. Melted crayon technique: 
    1. Take the crayon that you will be using, 1 crayon did all the letters needed for 1 color, peel off the paper.
    2. Place some paper or paper bag on your work surface. 
    3. Using an iron, I use a small iron used by quilters it's about 1 1/4" triangle, set it on medium, carefully melt the crayon over the chipboard/cardboard. It will melt fast so don't stay in one place to long. Once you have covered your chipboard use the iron to melt/move the wax around till you have a somewhat smooth surface. 
    4. I will put a video on later showing my melted crayon technique. 
  8. Glitter and flock the remaining letters. 
  9. Using fast drying tacky glue, glue all the letters to either the corrugated cardboard or the shimmering silver paper. Remember vowels go on cardboard and constants go on silver.
  10. Alternating your black frames with decorative paper tape/glue on your letters, I tilted mine different ways to add interest. SEE Picture above for reference.
  11. Now for the Owls and Pumpkin. 
    1. The Owls were made using chipboard (Stamp'n Up) and decorative paper. 
      1. Glue decorative paper to your chipboard owl. Let dry overnight.
      2. Carefully cut around owl, cutting out the eyes and beak as well.
      3. Using tacky glue and a small paint brush add glue around the outer edge of the owl and also add glue to the beak and eyes.
      4. Using your black glitter sprinkle it all over. Knock off excess and let dry.
      5. Add right onto 1 of 2 black frames with tacky glue repeat with the second one.
      6. Using 4 small hearts for wings I flocked them in black. Let dry then glue onto the owl with tacky glue.
    2. The Pumpkin was made from a punch I have, If you don't have a punch free hand it. 
      1. Add googly eyes and a mouth.
      2. Punch a whole in the top and add a piece of twine.
      3. Glue it to 1 piece of corrugated cardboard.
      4. Glue that to one piece of decorative paper.
  12. Now all of your frames are almost done. We still have to add some bling. Add googly eyes, metallic confetti, and gems. Dazzle them up. (again sorry my pics are blurry) I added purple eyes to the owls and a purple bow tie. To keep the look cohesive bling out your frames with the same decorative paper the same way. 


Almost done. Using a small whole punch, punch out whole for the cord. I used a bent piece of wire to help thread my cord. Leave about 10" of cord for hanging on each side. Tie a knot 10" down the cord, thread through the front and come up through the back tie anther knot to keep it in place. continue till you get to the pumpkin leaving a 10" cord tail at the end. Continue withe the rest of the frames to the end. Your done. 

I have not written very many tutorials, if you have questions, which I'm sure you do, please use the comment space to ask me to explain anything further. This will not only help you with the project but help me become a better teacher. Thanks. I hope you like my projects. And yes I will be asking Santa for a new digital camera this year.

Flower Thank You pop out box with flower topper.


Box pop out Thank-you cards for teachers.

I made these at the end of the school year for the teachers. First I made a box template ( sorry don't have the template for you. If you are interested though I will make a new one and post). Then added different papers and die cut embellishments. I had little bottles that I saved. I punched a punch of paper flower and filled the bottles with them then decorated the bottle. 


Close up view. Not very clear, sorry.


Next I made the flowers using the above items and a punch from Stamp'n Up. Punch out 1 circle and 10 petals. Use the ink pads to add colors, the circle is just the brown color.  I just pressed my paper into the ink.  Use your dry stencil pen to mark veins in your leaves, also crinkle them up in your hand to add interest. Use your glue to layer the first 5 petals unto the circle using the "tab" on the petal to as your guide. Place the petal so that just the tab is on the circle. Then, layer the second 5 so that the bottom 5 tips show through. Using your crystal effects glue place a glob of glue in the middle of the circle. Spread it around evenly. Place your seed beads in a spiral pattern starting in the middle and working your way out. your done.


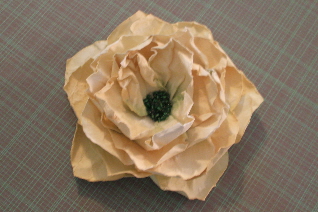
To make the Peony flower I used the same technique. 1 circle and lots of "petal" punches. Use a soft yellow stamp pad to add the color. Now crinkle all your petals, the more the better. Start adding your petals to your circle 5 at first. Next layer add 5 more. Keep this up to you get the fullness that you want. When I got to the end of my layers I really crinkled those leaves (see picture above) also I added a touch of green to the bottom of the petal. Next step: add a glob of crystal effects glue to the middle, do not spread, place a small amount of green seed beads, add more glue if needed to keep beads in place. Now you have a peony flower.

Make your box top, add your flower and embellish box. Your done! A gift for anyone you would like to say thanks to.


Pumpkin People Pen Holder

Halloween Pen Set for any counter.

I found this patterns on  http://www.marthastewart.com/267447/felt-pumpkin-people or you could watch the video at http://www.marthastewart.com/251209/felt-pumpkin-people-2 .

 I altered the pattern a bit to make my own "pumpkin people" and "pumpkin heads". Added a few embellishments like pipe cleaners and leaves. Glued some heads unto pens and put them in a pail full of beans and then glued it all to a board covered in green crepe paper, and poof created a counter top Halloween gift for the office staff at my son's High School. 

You could also make it for your office or Dentist/Doctor's office. Wherever people are going to need pens. Hope you enjoy.


You could also take the heads only and add a circle of black felt and a black twisted pipe cleaner and make them witches. Put your witch heads on a little Halloween pail filled with candy and you have a cute teacher gift.

Or make lot of Pumpkin People to give as gifts.
Hope you enjoyed my first ever Blog post.